Normally, Dynamics AX forms are created in AOT by
adding various controls to the form's design and do not change during
runtime. But besides that, Dynamics AX allows developers to add controls
dynamically during form runtime.
Probably, you have already noticed that the Document handling form in the standard Dynamics AX application has a nice option to create a new record by clicking the New
button and selecting the desired document type from the list. This
feature does not add any new functionality to the application, but it
provides an alternative way of quickly creating a new record and it
makes the form more user-friendly. The content of this button is
actually generated dynamically during the initialization of the form and
may vary depending on the document handling setup.
There might be other
cases when such features can be used. For example, dynamic menu buttons
could be used to display a list of statuses, which depends on the type
of the selected record.
In this recipe, we will explore the code behind this feature. As an example, we will modify the Ledger budget button on the Chart of accounts
form to display a list of available budget models relevant only for the
selected ledger account. That means the list is going to be generated
dynamically and may be different for different accounts.
How to do it...
1. Open the LedgerTable form in AOT.
2. Add the following variable to its class declaration:
3. Delete the ButtonBudget menu item button located in the form's ButtonGroup.
4. Create a new button of type MenuButton instead in the same place as ButtonBudget with the following properties:
|
Property
|
Value
|
|---|
|
Name
|
ButtonBudget
|
|
AutoDeclaration
|
Yes
|
|
Text
|
Ledger budget
|
5. Override its clicked() method:
void clicked()

{
MapIterator mapIterator;
BudgetModel model;
LedgerBudget budget;
FormFunctionButtonControl menuItemButton;
;
if (modelMap)
{
mapIterator = new MapIterator(modelMap);
mapIterator.begin();
while (mapIterator.more())
{
element.design().removeControl(mapIterator.key());
mapIterator.next();
}
}
modelMap = new Map(Types::Integer, Types::String);
while select model
where model.Type == HeadingSub::Heading
&& model.Blocked == NoYes::No
exists join budget
where budget.ModelNum == model.ModelId
&& budget.AccountNum == LedgerTable.AccountNum
{
menuItemButton = ButtonBudget.addControl(
FormControlType::MenuFunctionButton,
'LedgerBudgetModel');
menuItemButton.text(model.Txt);
modelMap.insert(menuItemButton.id(), model.ModelId);
}
super();
}
6. Add a new MenuItemButton to this MenuButton with properties:
|
Property
|
Value
|
|---|
|
Name
|
LedgerBudget
|
|
MenuItemType
|
Display
|
|
MenuItemName
|
LedgerBudget
|
|
Text
|
All models
|
7. Insert a Separator afterwards.
8. The form should look like this in AOT:
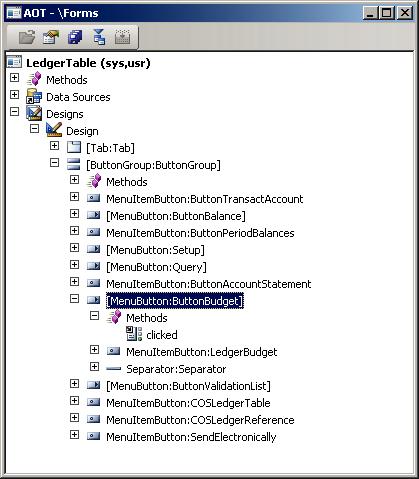
9. Next, add the following code to the top of the form's run() right after the variable declaration section:
element.controlMethodOverload(true);
10. And finally, create a new form method:
public void ledgerBudgetModel_clicked()
{
FormFunctionButtonControl menuItemButton;
BudgetModelId modelId;
Args args;
FormRun formRun;
FormDataSource fds;
QueryBuildDataSource qbds;
QueryBuildRange qbr;
;
menuItemButton = element.controlCallingMethod();
modelId = modelMap.lookup(menuItemButton.id());
args = new Args(formstr(LedgerBudget));
args.record(LedgerTable);
formRun = classfactory.formRunClass(args);
formRun.init();
fds = formRun.dataSource();
dynamic menu buttondynamic menu buttoncreatingqbds = fds.query().dataSourceTable(
tablenum(LedgerBudget));
qbr = qbds.addRange(fieldnum(LedgerBudget,ModelNum));
qbr.value(queryvalue(modelId));
qbr.status(RangeStatus::Hidden);
formRun.run();
formRun.wait();
}
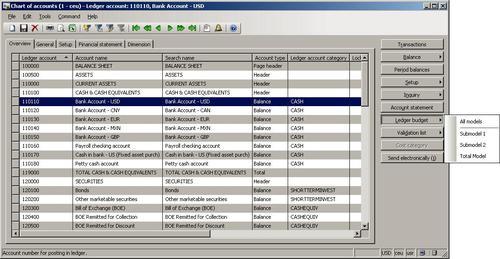
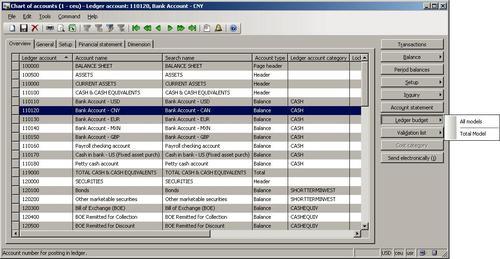
11. To test the results, open General ledger | Chart of Account Details, and expand the Ledger budget menu button for several accounts containing budgets for different models. Notice how the content of the Ledger budget menu changes depending on what budgets are configured for the selected account:
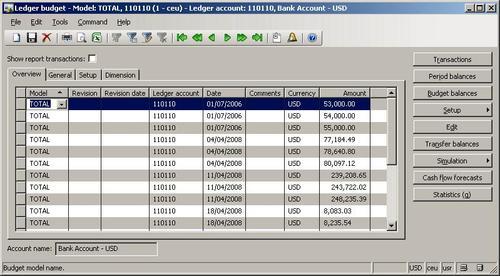
12. If you click on one of the available options, for example, Total Model for account 110110, then you get a list of ledger budget records for this particular account and this particular model:
How it works...
We start the example by adding a new Map
variable to the form's class declaration section. We will use it
temporarily for storing a list of available budget models along with
dynamically created control numbers.
The next step is to replace the existing Ledger budget
menu item button with a menu button. This will allow a user to expand
it and select one of the options inside it. Notice that the new button
is named exactly the same as the previous one. This is because there is a
standard code on the form that handles the button's availability
depending on the type of selected account. By leaving the same name, we
ensure that the code will compile and work properly.
Now, we need to override the button's clicked(). The code in here will be executed once the user has clicked on the Ledger budget button, and it will create dynamic menu item buttons. The code has to be before super() to make sure the super() "knows" about all the controls in this menu button.
The code starts with
first removing all existing items, in case they were created
previously. We have to perform this operation, otherwise the list will
keep increasing with every user click. We loop though the modelMap variable and remove every control from the form's design that matches the value in the Map. This part of the code is not executed when a user opens the Ledger budget menu button for the first time, because modelMap is not initialized yet. After this, we reset the Map by recreating it.
The second part of
this method loops through existing budget models for the currently
selected ledger account and creates a new menu item button for every
model. Here, we also prepare the modelMap
variable for further use by storing the number of the newly created
control and the budget model ID. Notice that we have set the same name LedgerBudgetModel for every control created. As we will see later, this is done on purpose.
To finish with the Ledger budget menu button, we also add a menu item button pointing to the original Ledger budget
form along with a separator. There are two reasons for this. First, we
still want to keep the original functionality allowing the user to open
the Ledger budget form if there are no budget records. And secondly, by having something inside the Ledger budget
menu button, we force it to be displayed during the initialization of
the form. If this menu button was empty, it would simply not be
displayed on the form and the code in its clicked() method would never be executed. Lastly, the separator simply distinguishes the static and dynamic parts of the content.
Finally, we have to ensure that the correct form is opened once the user
selects one of the dynamic options. We could have assigned the LedgerBudget menu item to every control created, but this would not filter the opened Ledger budget form with the chosen budget model. In order to achieve that, we have to override the button's event with our code. By calling controlMethodOverload(true),
we enable form control event overriding. Now, we have to create a new
form method with a name consisting of the control name and event name
separated by an underscore, i.e. for our dynamic control named LedgerBudgetModel, we have to create ledgerBudgetModel_clicked(). In this method, we retrieve the value of the currently selected budget model, create and initialize the LedgerBudget form, apply the budget model filter to its data source, and run it. In this way, we simulate the execution of the LedgerBudget menu item and also set the required filter.
The last thing to
mention here is about the security. When building dynamic controls, it
is very important that the created functionality can still be properly
controlled by the Dynamics AX security system. For example, in this
recipe, if a user does not have access to the LedgerBudget menu item, then the Ledger budget
menu button will be automatically inaccessible, and there will be no
further access to dynamic buttons inside it. This is because during form
initialization, only "real" controls are considered so as only the menu
button control's LedgerBudget menu item is disabled by the security, the whole menu button will be hidden too.